
Planning for a motorized screen? Avoid these common mistakes
February 25, 2020
Planning for a motorized screen? Avoid these common mistakes
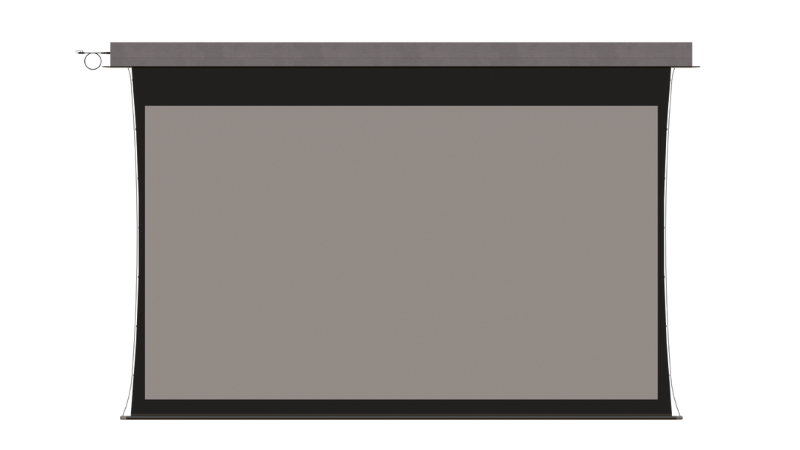
Nobody likes to make mistakes but if we make them, we need to learn from them. In an earlier article about motorized screens we described the need to pre-plan the amount of top black border (aka screen drop). This article addresses the dreadful (and highly visible) flaws when tab-tensioned motorized screens are not designed correctly for the amount of drop that is selected. Big deal you say? Not at all, as long as you think your client will want to live with wrinkled corners. Not my idea of fun!

If you think the right answer is to avoid tab-tensioning, all we can say is NOT! Properly specified, tab-tensioning goes hand in hand with utilizing high-grade PVC screen material. Whatever the surface color or gain, all screens wider than 8 feet (2,4m) should use PVC materials with tab-tensioning. The PVC material is necessary for the high resolution of today’s and tomorrow’s projectors. Be prepared. Stop for a moment and think of 4K, 8K, and yes, 16K. Look to the future rather than the days gone as you try to forget the reinforced vinyl common in classroom screens of your fathers’ generation.
There are two flaws regularly seen in our business. One is when the designer adds extra drop in the plan but doesn’t use it on site. The second is when the designer needs to include a lot of drop to position the image but doesn’t address the overall shape of the screen to ensure the tensioning works to keep a flat screen.
MISTAKE NUMBER 1: EXTRA DROP
Let’s address the first failing. Every projection screen venue needs to be accurately measured. That’s kind of obvious and many of you will probably say “sure, I do that.” If you do, then great and you get a gold star but if you are being honest and it is not you, may we suggest the following: don’t take the shortcut of just adding drop and fixing the positioning during installation. The tab-tensioning cable relies on the complete (or near complete) deployment of the screen. Only when completely extended does this cable fulfill its destiny to pull the screen flat and hold it there for a flawless installation! Take the extra steps and make your clients smile.
MISTAKE NUMBER 2: WRONG SHAPE
The second failing happens when the overall shape of the screen does not meet the 4 to 3 rule. Sounds like a 1990’s image or an old Laurel and Hardy movie. Almost. Every tab-tensioned screen must have the overall width of the screen at least 1.33 times the height. Wider is fine, but less width will lead to wrinkled corners. Don’t allow yourself to fall victim to this major and all too common failure. Add more side bordering if you need it and deliver the best outcome (without wrinkles) for your client.
How do you do it? Consider a design process that starts with just a screen shape without an image. These four steps get you started.
- Plan the placement of the case. How high is that?
- Plan the bottom of the screen. How low is that?
- Plan how wide the screen needs to be, if necessary to hide things, or if limited by the side walls.
- There’s a blank rectangle. Does the width exceed the height by at least 1.33 to 1?
After you have a blank rectangle, plan to overlay the image area. The bottom of the image has to be visible to all viewers without obstructions from furniture, heads or raised stages. The height of the image should be tall enough to have the images clearly seen from the back row. For more on this check out our article on DISCAS for the correct screen size to viewer distance calculations. The width of the image is chosen based on multiple factors such as content, projector aspect ratio and lens. Place this space inside the blank rectangle. Everything else is black border. It’s not “standard”. It’s custom and it delivers the best final results.

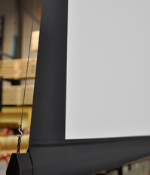
PAINTED VS WELDED BORDERS
One more thing as we’ve been discussing tab-tensioning and black borders. Not all screen suppliers address these topics in the same way. Most still use old fashioned painting technology for these black areas. No wonder there are stories about stickiness and tabs being torn out after screens were rolled up for extended periods. They aren’t urban legend. They are real and you can avoid them. Strong/MDI and some others recognized the flaws of black paint and developed the welded borders. Instead of black paint, the borders are black PVC. Permanently black without risks of chipping, peeling or stickiness. Compare the image below to the one at the top of this article and see for yourself the visible quality difference.
By understanding the pitfalls, you’re prepared to serve your client by designing the best tab-tensioned motorized screen possible. Want some help? We are here for you. Contact our sales team through our website. Let’s get after it.