
Screen Installation Guide
Screen Installation Guide
STRONG/MDI SCREEN INSTALLATION GUIDE
The following are Strong/MDI guidelines for the installation of screens.
Strong/MDI recommends two methods for installing screens: flying and vertical. Flying installation is often used with screens measuring more than 30’ wide. Vertical installation is the preferred method for smaller screens or in auditoriums without enough floor space to unroll the screen completely.
Before installing ensure:
-
That the auditorium is at a temperature between 20°-25°C / 65°-75°F.
-
That the screen has had sufficient time to acclimatize to ambient temperature; this may take up to 24 hours.
-
That the auditorium is clean and dry and that there is sufficient room to unfold or unroll the screen completely (for flying installation)
What you will need:
-
An installation team of 4 people for screens measuring up to 20’ in width. Up to 10 people may be required for large screens.
-
Strong rope for lifting the screen (flying) or for lifting tube vertically (vertical installation).
-
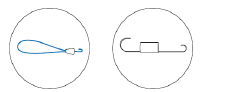
Strong/MDI bungees or springs for attaching the screen to the frame.
-
Scaffold or platform with wheels to move the screen across the frame.
Special precautions:
-
Screens must be installed within 12 weeks from the date of shipment to avoid markings.
-
If warehousing is required:
Make sure the warehouse is kept between 15°C-25°C (60°F-78°F) and has a humidity rate ranging between 30%-60%.
Never leave screen in warehouse more than 3 months.
Always make sure screen has acclimatized to auditorium before manipulating.
- Always manipulate screen carefully, wear gloves and avoid touching the surface of the screen. Handle screen by the edges only.
Always install screens with proper screen ties: springs, bungees or strong cord (if lacing the screen).
-
Make sure the screen frame is clean and that there are no sharp edges that could potentially damage the screen surface.
Steps
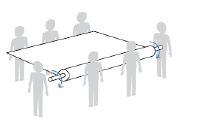
FLYING INSTALLATION
-
Carefully unpack the screen, make sure the surface does not rub against the packaging and ensure that there are enough people supporting the screen so that the central tube does not bend.
-
Place the screen in front of the frame with the label front/top to the right and carefully unroll. Wear gloves and remove all personal items (jewelry, watches). Avoid creases and folds by having enough people to maintain tension while unrolling.
-
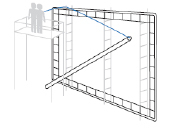
Tie the screen at regular intervals (approximately every 4 feet) onto the eyelets with strong rope and place people at top and bottom of scaffolds set up in the back of the screen. Screen must be pulled up slowly and kept level at all times. Once again, tension must be maintained to avoid creases and folds.
-
Secure the screen temporarily to the frame using the cord already tied onto the eyelets at the top of the screen, making sure the screen remains level and that there are no creases or folds.
-
Attach the screen onto the frame with springs or bungees using one of the two methods outlined below.
METHOD 1: SCREEN ATTACHMENT USING SPRINGS
In this method, the screen is slightly smaller than the structure; there is gap between the screen borders and the frame. Springs are the preferred attachment for this method. Lace-in, which involves passing a small cord through the eyelets, lacing the screen onto the structure, is also sometimes used.
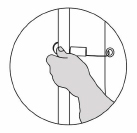
- TOP: Starting from the middle of the frame and moving outward attach the screen to the frame using springs. Attach at every other eyelet, making sure the gap between the frame and the screen is even.
- BOTTOM: Work out from the middle of the frame, attach at every other eyelet. Make sure there is enough tension to avoid creases and folds, but avoid overly stretching the material.
- SIDES: Start from the top, attach the screen at every other eyelet.
- Install remainder of springs to secure screen into position.
- The screen may stretch in the first few days following installation; if necessary; re-tension the screen from the bottom only.
METHOD 2: WRAP-AROUND SCREEN ATTACHMENT
In this method, the screen is wrapped around the structure. Bungees are the preferred screen tie used in this method. Lace-in, which involves passing a cord through the eyelets, to lace the screen onto the structure from behind, is also sometimes used.
-
When hoisting the screen, the people placed at the top of the scaffold very carefully pull the screen over the top of the structure.
-
Make sure the screen is secured properly to the top of the structure using bungees in every other eyelet.
-
Wrap screen around the frame at the bottom center and attach, make sure screen material is taut but not stretched.
-
Moving toward the sides, wrap and secure the screen at the bottom using bungees. Remove any wrinkles and creases by properly tensioning the material.
-
Working from top to bottom, secure the sides.
-
When the screen is secured on all sides, wrap around the corners and attach to the frame using bungees.

Make sure there are no creases in the material. Incorrect installation (left) vs correct (right).
STEPS
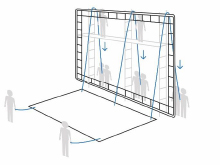
VERTICAL INSTALLATION
-
Carefully unpack the screen, make sure the surface does not rub against the packaging and ensure that there are enough people supporting the screen so that the central tube does not bend.
-
Make sure the top of the screen is to the right.
-
Attach the rope to the tube, loop it around the frame and hoist the screen.
-
Make sure there are enough people placed at the top and bottom of the tube to manipulate screen safely.
-
Attach the top and bottom corner eyelets to the structure and unroll the screen carefully.
-
Attach the top of the screen at regular intervals with the cord provided by Strong/MDI and already tied onto the eyelets at the top of the screen.

-
When the screen is completely unrolled, carefully lower tube, making sure it does not come into contact with the screen.
-
Remove the bottom corner attachment and proceed with one of the two attachment methods above (springs or wrap-around)
-
The screen may stretch in the first few days following installation; if necessary re-tension the screen from the bottom only.
CONTACT US FOR FURTHER INFORMATION OR FOR ADDITIONAL INSTRUCTIONS: 1 877 755-3795/450 755-3795, SALES@STRONGMDI.COM